USB authorization
See every USB storage drive plugged into your Windows computers, approve the ones you trust, and record, notify or block the rest.
What the page is for
USB authorization is a page in the Lavawall® console, in the Computers area of the menu. Lavawall is the RMM, security, and compliance platform from ThreeShield, built and hosted in Canada. About this feature.
Every USB storage drive plugged into a Windows computer is recorded here. You choose what happens to a drive that is not on your approved list: nothing, record it and notify you, or block it. A drive is identified by its vendor, product and serial number, so approving one memory stick does not approve every other stick of the same model. Each computer also has a USB tab on its own page, where you can give that one computer its own setting.
What you see
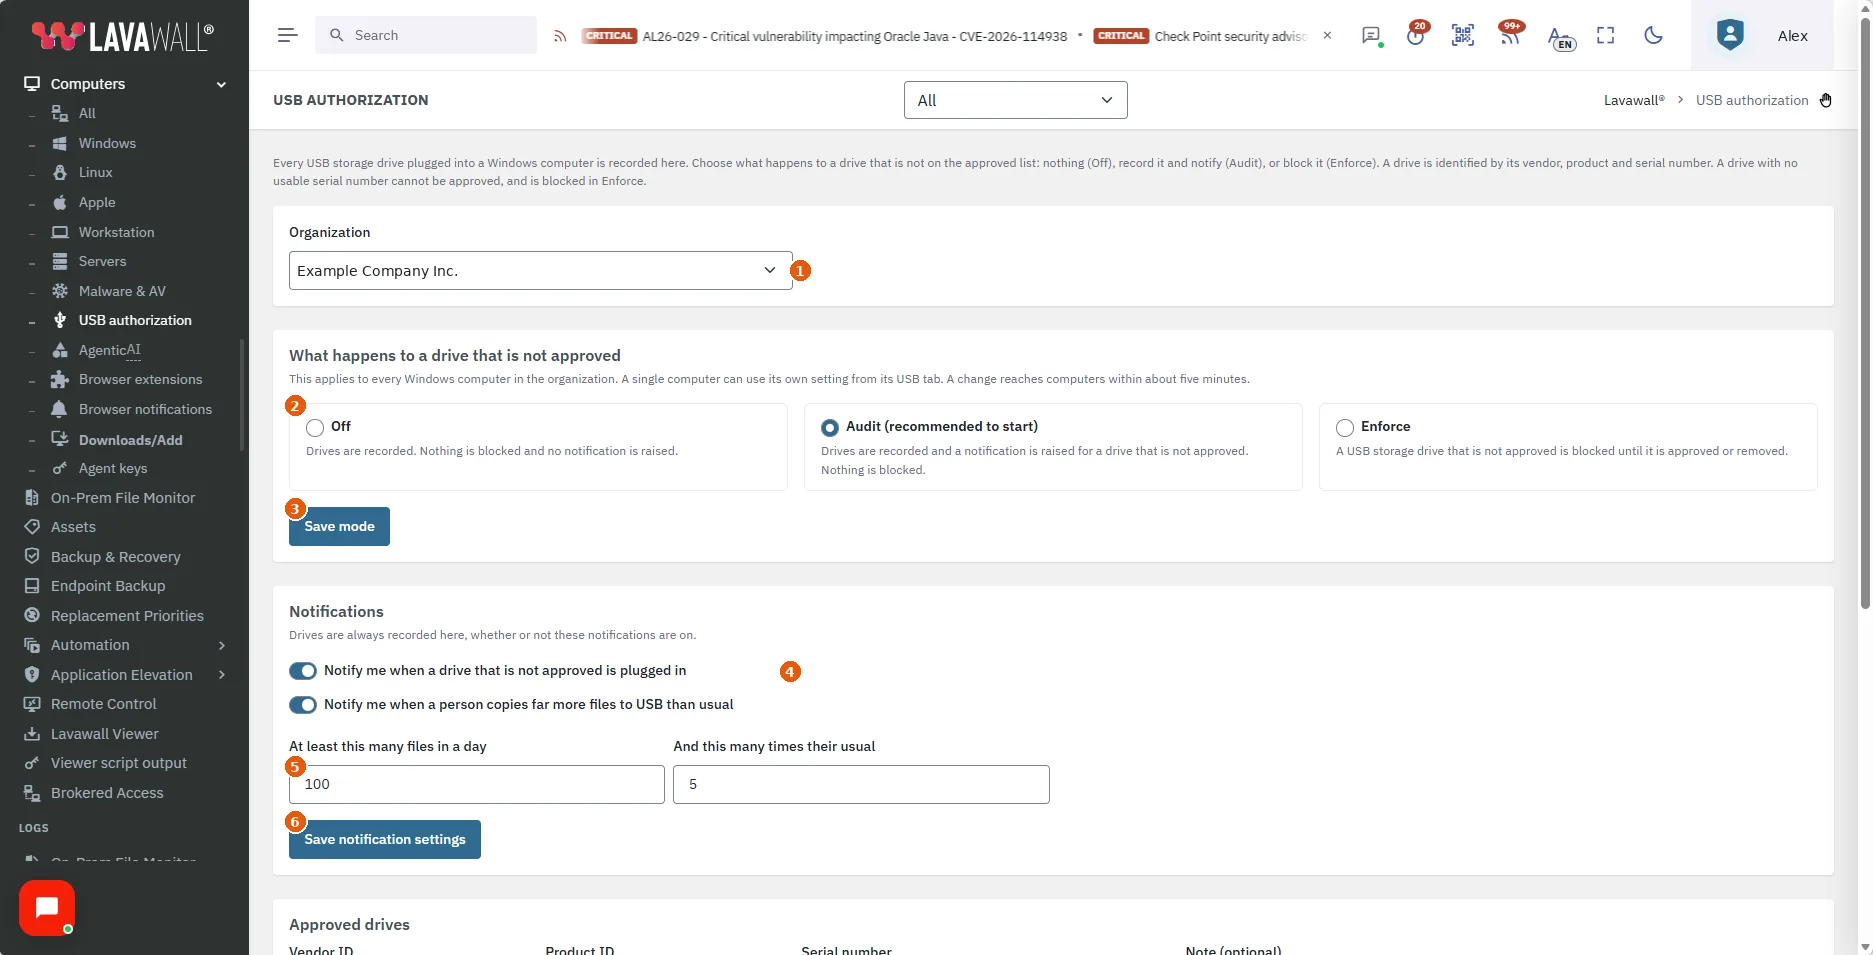
- Organization: the organization the page is showing. If you manage several, pick one here.
- The three modes. Off: drives are recorded, nothing is blocked and no notification is sent. Audit (recommended to start): drives are recorded and you are notified about a drive that is not approved, but nothing is blocked. Enforce: a USB storage drive that is not approved is blocked until it is approved or removed.
- Save mode: saves the mode for every Windows computer in the organization. A change reaches the computers within about five minutes.
- The two notification switches: Notify me when a drive that is not approved is plugged in and Notify me when a person copies far more files to USB than usual. Drives are always recorded here, whether or not these are on.
- At least this many files in a day and And this many times their usual: the copy notification is sent only when a person copies at least this many files in a day and that is at least this many times their own usual.
- Save notification settings: saves the two switches and the two numbers.
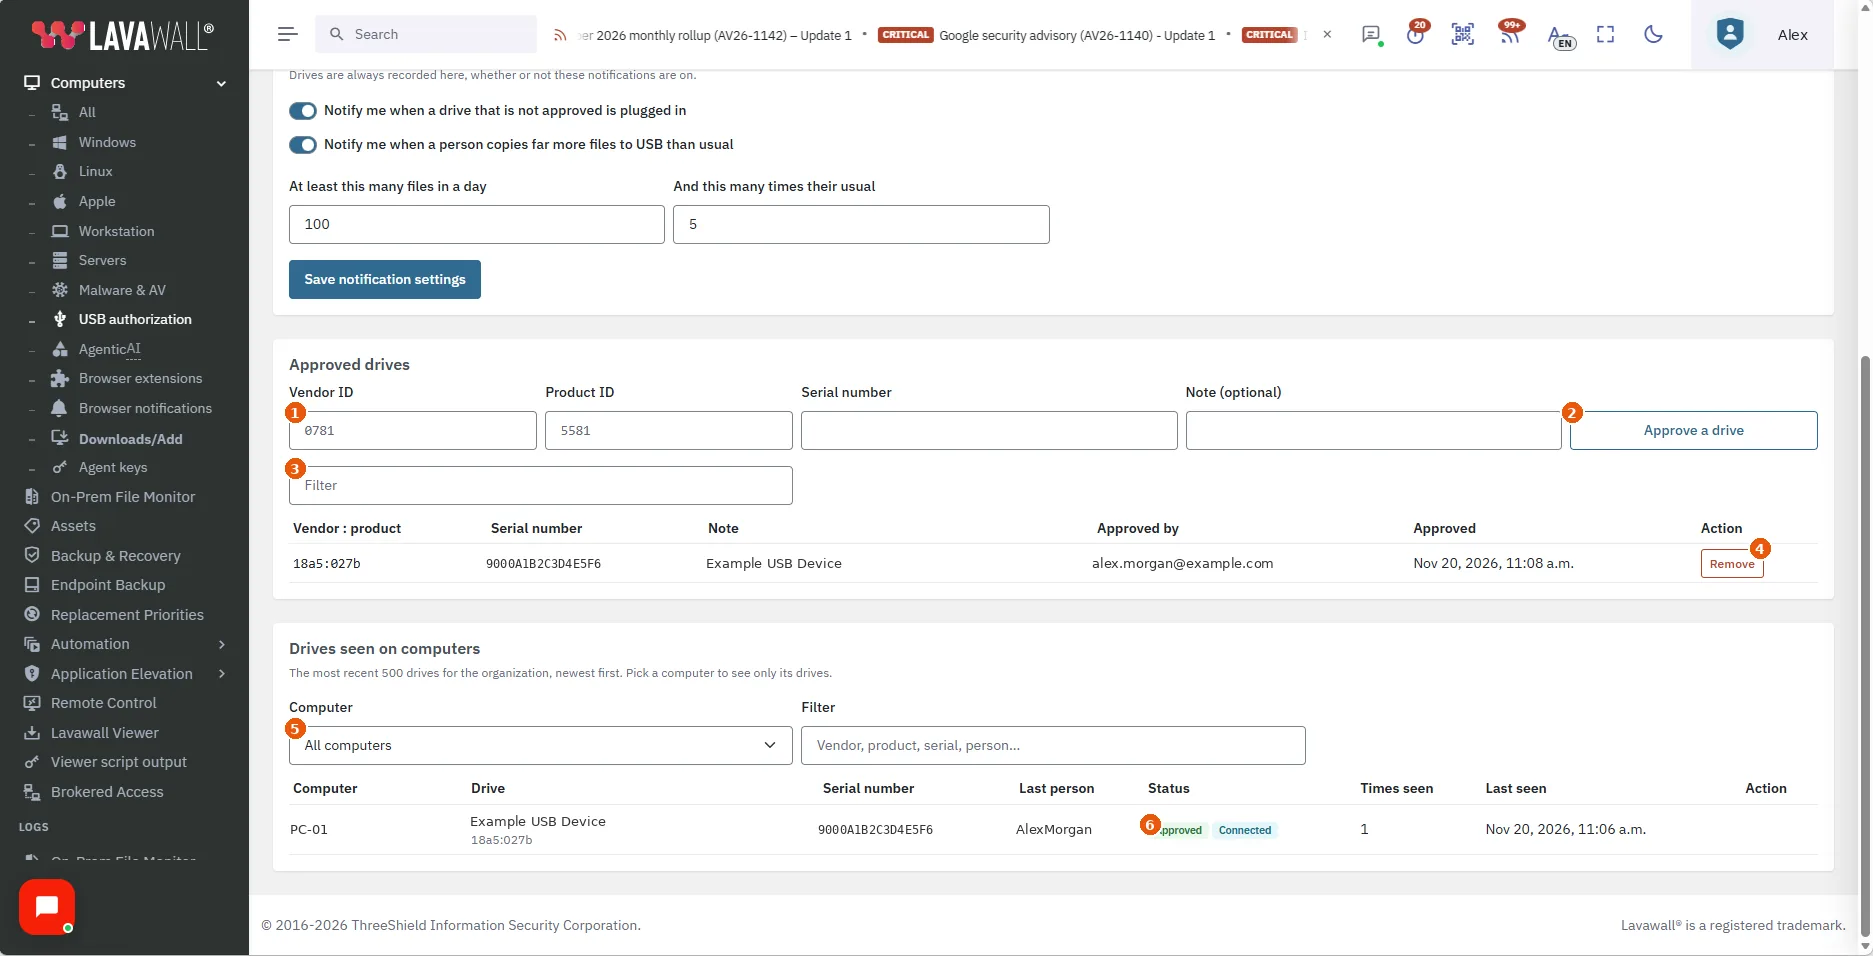
- Vendor ID, Product ID, Serial number and Note (optional): approve a drive by hand, for example before it is first used. The two IDs are four hexadecimal characters.
- Approve a drive: adds the drive to the approved list for the whole organization.
- Filter: narrows the approved list as you type.
- The approved list: Vendor : product, Serial number, Note, Approved by and Approved. Remove takes a drive off the list.
- Computer and Filter under Drives seen on computers: the 500 most recent drives for the organization, newest first. Pick a computer to see only its drives.
- The seen list: Computer (opens that computer's page on its USB tab), Drive, Serial number, Last person, Status (Approved and Connected, for example), Times seen, Last seen and Action. A drive that is not approved has an Approve button.
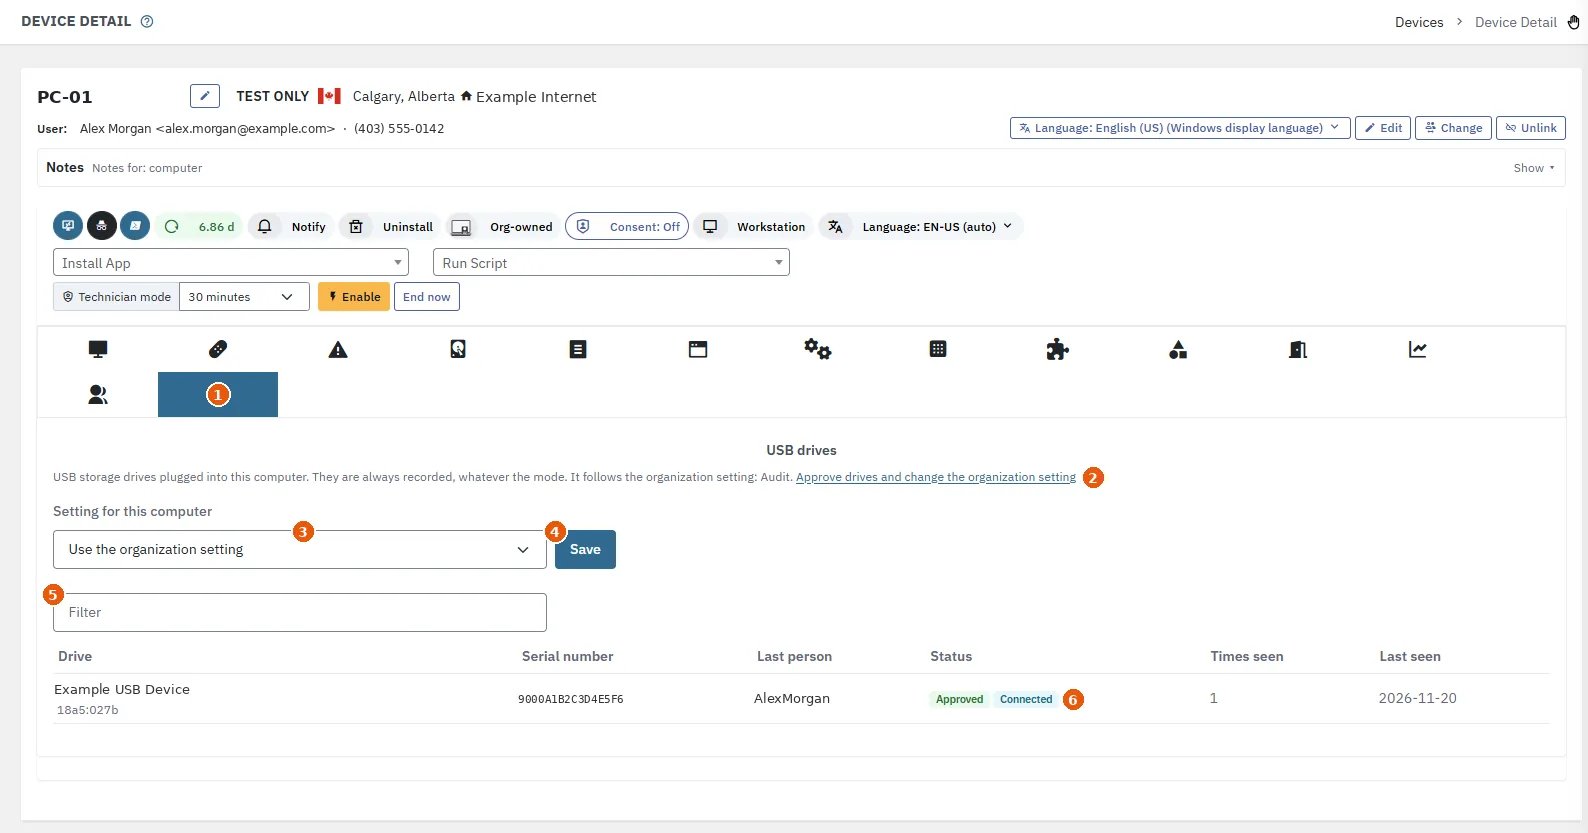
- The USB tab. It appears once a drive has been seen on that computer.
- A line that says which setting the computer follows, with a link: Approve drives and change the organization setting.
- Setting for this computer: Use the organization setting, Off, Audit or Enforce.
- Save: saves this computer's setting.
- Filter: narrows the list of drives seen on this computer.
- The drives seen on this computer: Drive, Serial number, Last person, Status, Times seen and Last seen.
How to use USB authorization
How to start safely
- Open USB authorization in the Computers section of the menu.
- Leave the mode on Audit (recommended to start). It is the default.
- Let people work for a week or two, then look at Drives seen on computers to see what is in use.
How to approve a drive
- In Drives seen on computers, find the drive and click Approve.
- Confirm Approve this drive for the whole organization?. Any computer in the organization will then accept the drive, whatever its mode.
- To approve a drive before it is plugged in, fill in Vendor ID, Product ID and Serial number under Approved drives and click Approve a drive.
How to remove an approval
- In Approved drives, click Remove beside the drive.
- Confirm Remove this approval?. In Enforce mode the drive is blocked again on its next check.
How to start blocking drives that are not approved
- Approve the drives people use first.
- Choose Enforce and click Save mode.
- Confirm Switch to Enforce?. Unapproved USB storage drives are then blocked on every Windows computer in the organization, except any computer set to its own mode.
How to give one computer its own setting
- Open the computer's page and click its USB tab.
- In Setting for this computer, choose Off, Audit or Enforce. Choose Use the organization setting to follow the organization again.
- Click Save.
How to choose your notifications
- Turn Notify me when a drive that is not approved is plugged in and Notify me when a person copies far more files to USB than usual on or off.
- Set At least this many files in a day and And this many times their usual if you want the copy notification to be more or less sensitive.
- Click Save notification settings.
Tips
- Start with Audit. It shows you what people use before anything is blocked.
- A drive with no usable serial number cannot be approved, and is blocked in Enforce. Some inexpensive drives have none, or share the same one. Tell people before you turn Enforce on.
- USB authorization applies to Windows computers only. Drives plugged into a Mac or Linux computer are not recorded.
- A drive that is already plugged in when you turn Enforce on is checked too. Ask people to save and close files on a USB drive before the change, because a blocked drive can disappear from the computer.
- Blocking happens within seconds of a drive being plugged in, not instantly, and only while the Lavawall agent is running on the computer. Lavawall never blocks the drive Windows itself runs from.
- Approvals belong to the organization, not to one computer.
Troubleshooting
- "USB drive authorization is not set up yet."
- This page is not available for your console yet. Try again later, or contact support.
- "You do not have permission to change USB drive settings."
- Ask a Super Admin to give you the Enrol USB drives permission in user management.
- "This drive has no usable serial number, so it cannot be approved by identity."
- The drive does not report a serial number that Lavawall can use. Use a drive that does, or leave this one to your mode.
- "Check the vendor ID, product ID and serial number. The IDs are four hexadecimal characters."
- Read the two IDs again. Each is four characters, using only 0 to 9 and a to f.
- "USB authorization applies to Windows computers only."
- The computer you chose is not a Windows computer, so there is nothing to set for it.
- A drive I plugged in is not in the list.
- Drives appear after the Lavawall agent on that computer reports them, which usually takes a minute or two. Check that the computer is Windows and online.
Related articles
Still need help?
Search the support centre, or contact our support team and tell us which page you were on:
- Chat now: use the chat button in the bottom-right corner of this page to reach our team right away. Where cookie consent is needed, the chat starts after you accept (cookie settings).
- Email: send our support team a message through the contact page. It goes straight to a person.
- Phone:
 AB: 1-403-538-5053
 US: 1-406-988-7333
 UK: +44 20 3695 9786
Names, companies, devices and figures in the pictures are examples. Other product and company names are trademarks of their respective owners.