Access Policy
Decide who can reach the Lavawall console and remote support, from where, and how strongly they must sign in.
What the page is for
Access Policy is a page in the Lavawall® console, in the Account & users area. Lavawall is the RMM, security, and compliance platform from ThreeShield, built and hosted in Canada. About this feature.
The Access Policy page holds your organization's security rules for the console and for remote support sessions. You can limit access to trusted IP addresses or countries, require multi-factor authentication, single sign-on or a hardware security key before remote support, and set the default remote access given to new users.
Further sections control the encryption used for remote desktop sessions, the minimum standard for passkeys and security keys, how technician keys are approved on devices, password vault lockouts and time limits, and console session rules such as idle time-out, maximum session length, lockouts and a logon banner.
Most settings are saved together with Save Policy at the bottom. The vault, session policy, compliance and technician key sections have their own save buttons.
What you see
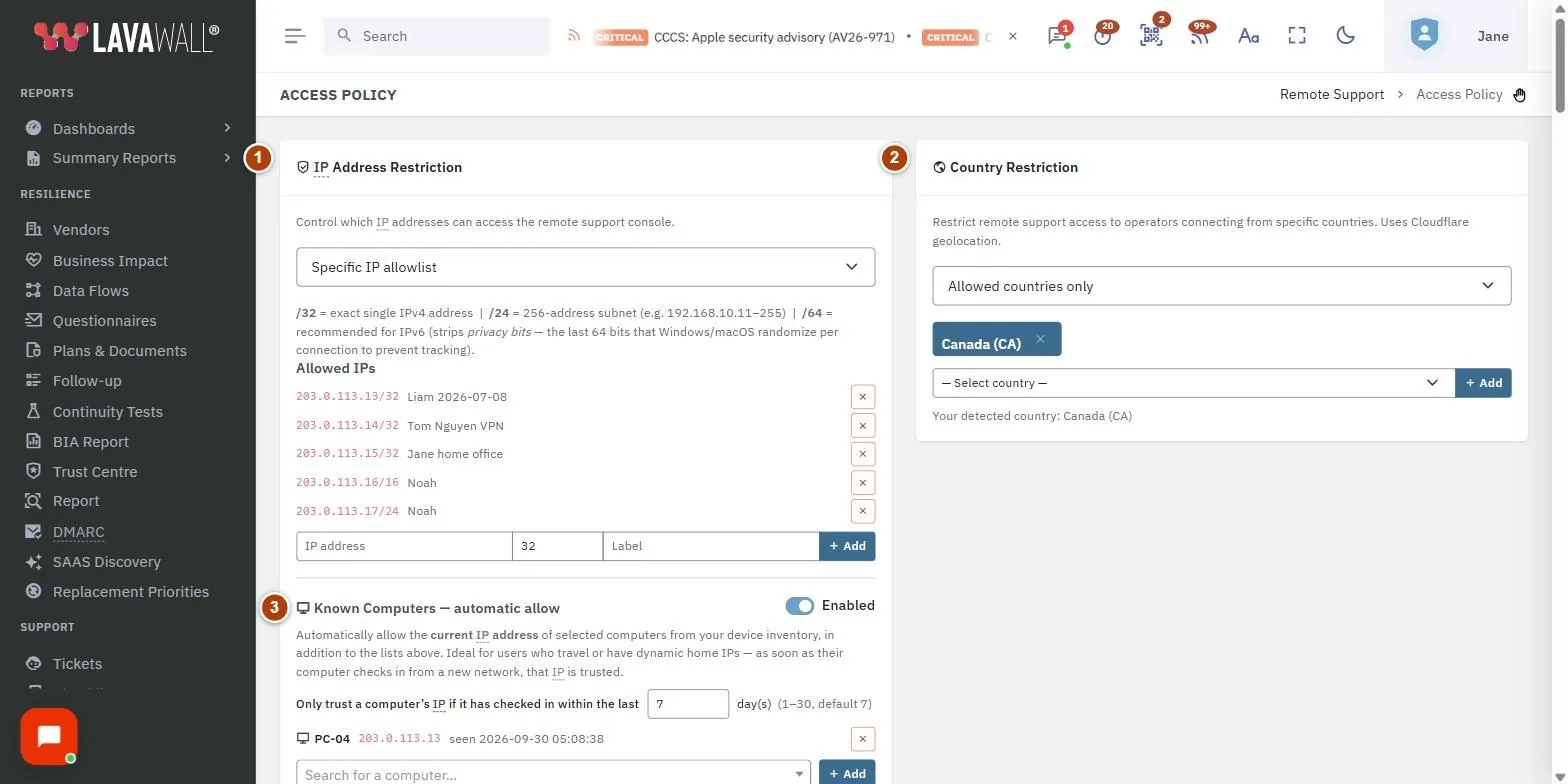
- IP Address Restriction: a mode drop-down with Trusted IPs and Allowed IPs lists, and Known Computers: automatic allow.
- Country Restriction: All countries or Allowed countries only, with a country list.
- Restriction Scope: whether the IP and country rules apply to Remote access only or the Entire console + remote access.
- Authentication Requirement: the extra sign-in needed before remote support.
- User Defaults: Default remote access for new users and client self-access options.
- FIPS, Passkey Assurance and End-to-End Encryption: remote desktop encryption mode, FIPS 140-3 compliance mode, Minimum authenticator standard, technician keys and the end-to-end session log.
- Vault Access Controls: unlock attempts, shares and pairing, key delivery, Session limits and Offline vault (each on its own row), passkey unlock, and Locked-out users.
- Console Session Policy: compliance standards, idle and maximum session times, MFA deferral, trusted computers, quick unlock methods, lockouts, logon banner and Locked accounts.
- Save Policy: saves the IP, country, scope, authentication, user default and encryption settings.
How to restrict console or remote access by IP address
- In IP Address Restriction, choose a mode: All IPs (no restriction), MSP & Client WAN IPs (from device inventory), Trusted IPs only or Specific IP allowlist.
- For a list mode, enter an IP address, a prefix length and a Label, then click Add. Use /32 for one IPv4 address, /24 for a 256-address subnet, and /64 for IPv6.
- Optional: turn on Known Computers: automatic allow, search for a computer and click Add. That computer's current internet address is allowed automatically whenever it checks in, which suits people who travel.
- In Restriction Scope, choose whether IP Restriction applies to remote access only or the entire console.
- Click Save Policy.
How to limit access to certain countries
- In Country Restriction, choose Allowed countries only.
- Pick a country and click Add. Repeat for each country. Click the × on a country to remove it.
- In Restriction Scope, set Country Restriction applies to.
- Click Save Policy.
How to require stronger sign-in for remote support
- In Authentication Requirement, choose Require MFA, Require Microsoft SSO, Require Google SSO, Require a hardware passkey with user verification, or Require a FIPS 140-3 validated security key.
- Click Save Policy.
How to set remote access for new users
- In User Defaults, choose Default remote access for new users: all companies, client companies only, own company only, or no remote access (the choices depend on whether you manage client companies).
- MSPs: choose whether to Allow client company users to remote their own company's devices.
- Click Save Policy. Change individual users on Users & Permissions.
How to set console session rules
- In Console Session Policy, set Idle limit (minutes), Maximum session length (hours) and Unlock window (minutes).
- Choose whether MFA enrolment may be deferred, and how many days Trusted computers may skip the authenticator code.
- Tick the Quick unlock methods allowed after the idle limit, and choose Lockout release, Failed attempts before lock and Lockout window (minutes).
- Optionally enter a Logon banner that users must acknowledge before signing in.
- Click Save Session Policy. To release a locked account, click Clear beside it under Locked accounts.
How to set vault lockouts and time limits
- In Vault Access Controls, set the limits under Unlock attempts, Shares and pairing and Key delivery and rate.
- Under Session limits, set Idle lock (minutes) and Maximum unlocked time (minutes), and choose whether Idle means away from the computer, not away from the vault and whether to Let a user change this for themselves.
- Under Offline vault, choose whether to Allow a device to keep an offline copy of the vault. Then choose whether a passkey may unlock the vault.
- Click Save Vault Access Controls. Clear a lockout under Locked-out users with Clear.
How to let people register in another region
Lavawall® keeps your organization on the console for its region: Canada (console.lavawall.com), the United States (usconsole.lavawall.com) or Europe (euconsole.lavawall.com). Someone who signs in on another region's console is taken to yours. The Regional Consoles section lets you make exceptions. Only Canada, the United States and Europe are offered, and a US government or CJIS organization is limited to the United States.
For a whole organization
By organization comes first. It lists your organization and each client organization, with Lives on (where it is kept) and People may also register on (the other consoles its people may use). A setting here applies to every verified domain of that organization.
- In Regional Consoles, find the organization under By organization. Type in Filter organizations to narrow the list.
- Under Add a console, choose the console and click Add, then confirm with Allow.
- To remove a console, click the × on its badge under People may also register on and confirm with Stop allowing.
- A badge marked (some domains) means only some of the organization's verified domains are allowed. Click Apply to all to allow every verified domain.
An organization with no verified domains shows "No verified domains: people are placed by their own email address." Allow its people one at a time, as below. The same setting for one client is in the Edit Organization dialog on List Clients.
For one domain or one person
- Under Your verified domains, Console shows where each domain is kept.
- To let everyone at one domain register on another region, tick that region under Also allow registration on and confirm.
- To make an exception for one person, enter their email address under People allowed to register on another region, choose the Region and click Allow.
- To remove an exception, untick the region beside the domain, or click the × beside the region on the person's row.
These changes save as soon as you confirm them. The Save Policy button does not apply to this section.
Tips
- Before switching IP or country restrictions to Entire console, add your own current address or country, or you may lock yourself out.
- Passkey enforcement can run in report-only mode first: leave Enforce this level off and check Users with no key that meets this level until it is empty.
- Security keys that meet this level lists hardware keys you can buy or issue before turning enforcement on.
- Settings marked "inherit" follow the parent organization's policy.
- Clearing a lockout is recorded in the activity log.
- Regional console exceptions are recorded in the activity log too. Data for someone who registers in another region is kept in that region.
Troubleshooting
- "You are not authorized to manage remote support policy."
- Only a Super Admin, or a user a Super Admin has given the Access Policy permission, can open this page.
- A section says it is not available yet or is read-only.
- That feature has not been switched on for your console yet. Contact support.
- Someone cannot sign in from home.
- Check the IP and country lists and the Restriction Scope, or add their computer under Known Computers.
- A technician's new browser is blocked.
- Under Technician keys, an administrator can clear the pin in Keys approved on each device so the device accepts the technician's next key.
- Someone is taken to another region's console when they sign in.
- Their account or domain is kept there. If they should use this region, add an exception under Regional Consoles.
- Only the United States is offered under Regional Consoles.
- US government and CJIS organizations are kept in the United States.
- A console badge says (some domains).
- Only some of that organization's verified domains may register on that console. Click Apply to all to allow every verified domain, or manage domains one at a time under Your verified domains.
- An organization says "Every region is already allowed".
- Its people may already register on every console offered. Remove one with the × on its badge.
Task guides that use this page
Related articles
Still need help?
Search the support centre, or contact our support team and tell us which page you were on:
- Chat now: use the chat button in the bottom-right corner of this page to reach our team right away. Where cookie consent is needed, the chat starts after you accept (cookie settings).
- Email: send our support team a message through the contact page. It goes straight to a person.
- Phone: AB: 1-403-538-5053, BC: 1-778-731-1339, ON: 1-289-724-8829, US: 1-406-988-7333, UK: +44 20 3695 9786.
Names, companies, devices and figures in the pictures are examples. Other product and company names are trademarks of their respective owners.