Phishing Reporter
Give every Outlook user a button to check and report suspicious email, and review everything they report in one place.
What the page is for
Phishing Reporter is a page in the Lavawall® console, in the Email security area. Lavawall is the RMM, security, and compliance platform from ThreeShield, built and hosted in Canada. About this feature.
The Phishing Reporter is an Outlook add-in. When a user opens it on an email, it checks the sender, SPF, DKIM and DMARC, links and attachments and tells them whether the message looks safe. The user can then report it as phishing, ask for a review if they are not sure, or mark it as safe. Every report appears on this page with its full analysis.
This page is also where you deploy the add-in to your Microsoft 365 organization, decide what happens to reported emails, choose who is notified, and tune detection with domain reputation overrides, trusted partner domains, brand relationships and a trusted sender allow list.
When your staff run phishing simulations, the add-in recognizes them and credits the user for catching the test. You can also upload a saved email or a PDF here to analyze it the same way the add-in does.
What you see
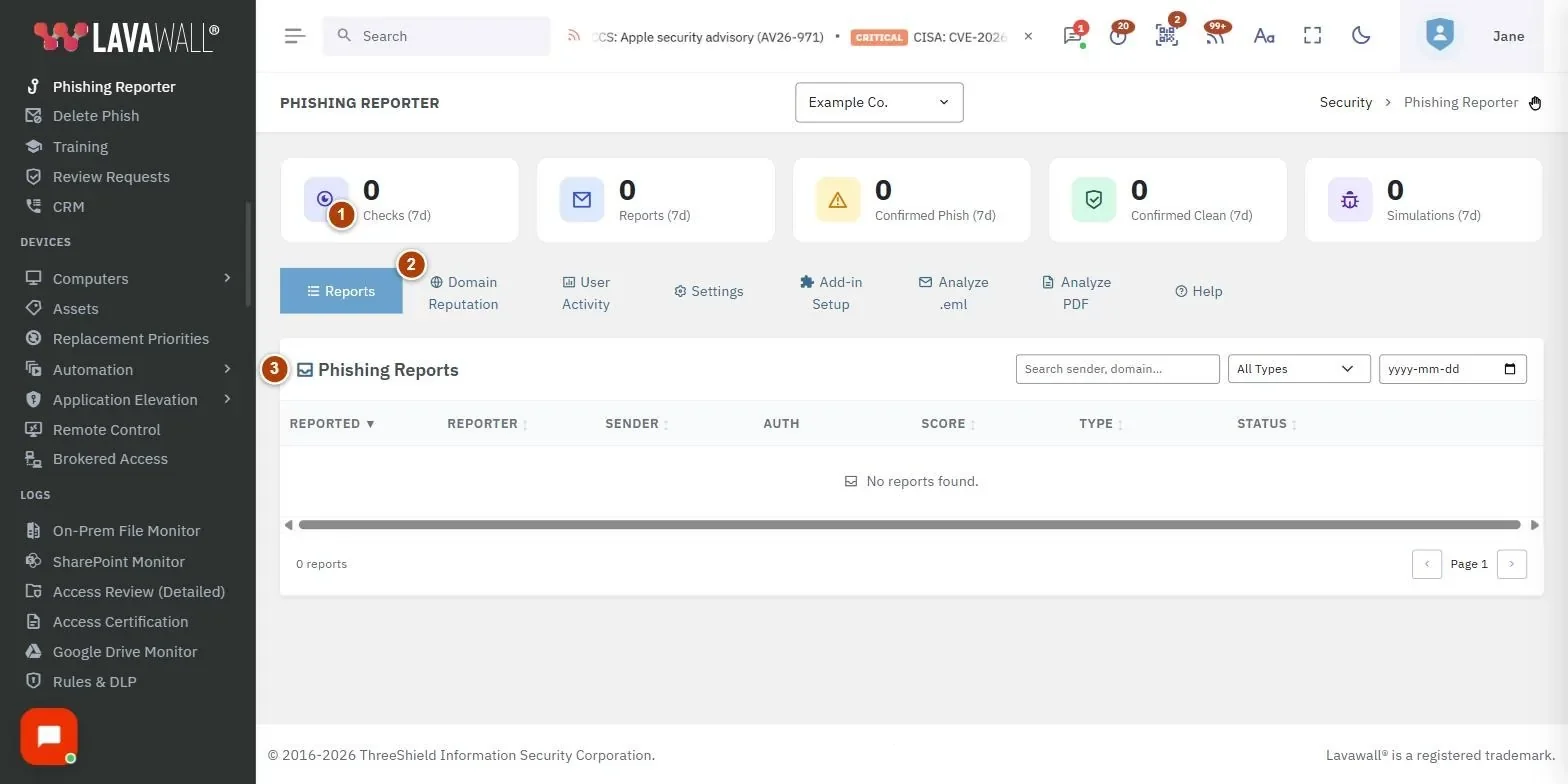
- Summary figures (last 7 days): Checks, Reports, Confirmed Phish, Confirmed Clean and Simulations.
- Tabs: Reports, Domain Reputation, User Activity, Settings, Add-in Setup (with a Not Deployed badge until deployed), Analyze .eml, Analyze PDF and Help.
- Phishing Reports: search, type filter (Simulated, Suspicious, Confirmed Phish, Confirmed Clean, Unreviewed), date filter and a sortable table with Reported, Reporter, Sender, Auth, Score, Type and Status, with paging.
- Report Detail: opens from a report: sender and authentication results, Microsoft risk scores, suspicion score and reasons, where links really go, a safe email preview, headers, Review Notes, a type picker with Save, and Delete Phish.
How to deploy the add-in
- Open Add-in Setup. If Microsoft 365 is not connected, click Connect Microsoft 365 first.
- Download the manifest, or copy the Manifest URL.
- Sign in to the Microsoft 365 admin centre as a Global Administrator and go to Settings → Integrated apps → Upload custom apps.
- Set the app type to Office Add-in, provide the manifest link or upload the file, and click Validate.
- Assign it to the Entire organization (or a pilot group), accept the permissions and click Finish deployment.
- The add-in appears in Outlook within 24 hours. If you installed it yourself earlier, click I've already installed it manually and then Mark as Deployed.
How to review a report
- On Reports, filter to Unreviewed or search for a sender or domain.
- Click a report to open Report Detail.
- Read the suspicion score and reasons, check where links go and preview the message safely.
- Choose a type (Confirmed Phish, Confirmed Clean, Suspicious or Simulated), add Review Notes and click Save.
- If it is phishing, click Delete Phish and choose By sender, By domain, By sender IP or By subject to find and remove the same email from other mailboxes.
How to block or trust a domain
- Open Domain Reputation and click Add Domain.
- Enter the Domain, choose a Reputation (Malicious, Suspicious, Clean / Safe or Simulated Phishing) and a Scope (this company only, or this MSP and its child companies).
- Add optional Notes and click Save.
How to set what happens to reported email and who is told
- Open Settings.
- Set the popup titles and messages users see for simulations and suspicious email.
- Choose where reported phishing is moved (Junk Email, Deleted Items or Don't move) and where verified simulations go.
- Enter Support / notification email address(es) and tick which user actions send a notification: Reported as Phishing, Not sure (submitted for review), Not Phishing: Mark as Safe.
- Optionally tick Also create a help-desk ticket for each report and Forward suspicious emails to notification address.
- Click Save Settings.
How to stop false alarms for known senders
- In Settings, add partners under Trusted Partner Domains with Add Domain.
- Under Brand & Subsidiary Domain Relationships, link a parent domain to a brand domain that sends on its behalf.
- Under Trusted Sender Allow List, add a sender by name and email, email address or whole domain, with a reason and scope.
How to analyze a saved email or PDF
- Open Analyze .eml and drag in a .eml file, or open Analyze PDF and drag in a PDF.
- Read the results. For an email, click Submit to Reports to add it to the report list.
- Use Load Sample on the .eml tab to try a test scenario.
Tips
- Start with notifications for Not sure only (the default). Users who are unsure are the ones who need a quick answer.
- User Activity ranks users by how often they check, report, request review or mark emails safe. Use it to find champions and people who need training. Click Export CSV to download it.
- Simulations never trigger notifications or help-desk tickets, and users are credited automatically.
- In Status, blue analyzed means the report has been checked automatically but not reviewed yet; green resolved means someone saved a review.
- Trusted partner domains still need to pass SPF or DMARC to show as trusted.
- External reputation lookups send only the bare domain name, never email content. They are on by default.
- Links to services such as Google Docs, Dropbox, SharePoint, Calendly and Egress are marked Trusted, often abused. The service is legitimate, but anyone can publish on it, so the linked page is still checked and users are warned not to enter a password or payment details there.
- A picture embedded in a reported email shows in the Email Body Preview and is labelled Embedded in the message under Attachments. An attachment that was not scanned says Not scanned.
- Previews never load anything from the internet, so opening a report does not tell the sender it was looked at.
Troubleshooting
- "Connect Microsoft 365 first."
- The add-in needs a connected Microsoft 365 tenant. Click Connect Microsoft 365.
- The add-in has not appeared after 24 hours.
- See Add-in not appearing after 24 hours in the setup troubleshooting list. Check the users were assigned in Integrated apps.
- "Deployment failed" with no clear reason.
- The admin account may be missing an Exchange Online licence or the Exchange Administrator role, or an earlier failed deployment left an entry. Try the other upload method.
- Users get a consent prompt every time.
- The permissions step was skipped during deployment. Re-deploy and accept permissions. The add-in only asks to sign in and read the user's profile.
- SPF / DKIM show as grey in the add-in.
- See the setup troubleshooting list on the Add-in Setup tab.
Task guides that use this page
- Deploy the Phishing Reporter and clean up a reported phish
- Launch security awareness training and a phishing test
Related articles
Still need help?
Search the support centre, or contact our support team and tell us which page you were on:
- Chat now: use the chat button in the bottom-right corner of this page to reach our team right away. Where cookie consent is needed, the chat starts after you accept (cookie settings).
- Email: send our support team a message through the contact page. It goes straight to a person.
- Phone:
 AB: 1-403-538-5053
 US: 1-406-988-7333
 UK: +44 20 3695 9786
Names, companies, devices and figures in the pictures are examples. Other product and company names are trademarks of their respective owners.