Nessus Scanner
Bring your Tenable Nessus scan results into Lavawall so every vulnerability is matched to the devices you already manage.
What the page is for
Nessus Scanner is a page in the Lavawall® console, in the Reports area. Lavawall is the RMM, security, and compliance platform from ThreeShield, built and hosted in Canada. About this feature.
The Nessus Scanner page imports scan exports from Tenable Nessus (the .nessus file) and turns them into a list of hosts and vulnerabilities you can browse. Each scanned host is matched to a computer Lavawall already knows about, either from the Lavawall agent or from a LAN network scan, so you can see which device a finding belongs to.
Nessus is optional. Lavawall works without it; importing scans adds the vulnerability scan sections to the Cybersecurity Assessment report.
You can upload files by hand, or give each company its own email intake address so your scanner can email its exports straight into the console. Only senders you approve are accepted.
Imported scans feed the vulnerability sections of the Cybersecurity Assessment report.
What you see
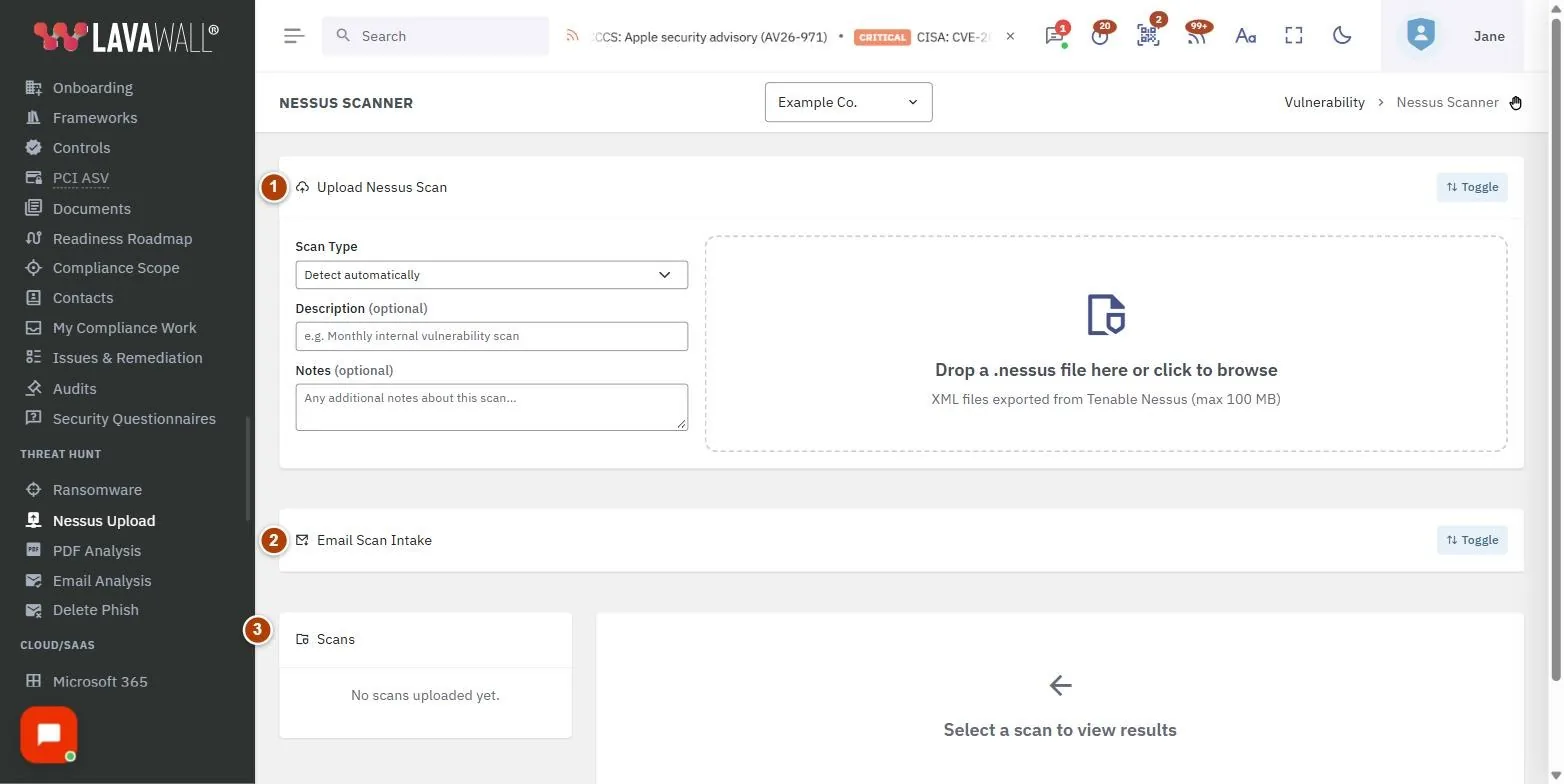
- Upload Nessus Scan: choose the scan type, add an optional description and notes, then drop in a
.nessusfile. - Email Scan Intake: a per-company email address that accepts scan exports from approved senders, with a log of recent messages.
- Scans: every uploaded scan for the company, with its type (LAN, WAN or Other), date, critical and high counts, and host count.
- By Device / By Vulnerability tabs: results for the selected scan, grouped by host or by vulnerability, with a Full Report button.
- Details: click a host or vulnerability to see the synopsis, solution, CVEs, CVSS scores, exploit status and affected hosts.
How to upload a scan
- Select the company in the company picker at the top of the console.
- In Upload Nessus Scan, choose a Scan Type: Detect automatically, LAN (Internal) Scan, WAN (External) Scan or Other.
- Optionally enter a Description and Notes.
- Drag a
.nessusfile onto the drop area, or click it to browse. The upload starts as soon as you pick the file. - When processing finishes, the scan appears in the Scans list.
How to review results
- Click a scan in the Scans list. The most recent scan opens automatically when you arrive.
- On By Device, review each host's OS, matched device, CVSS score and counts of Critical (C), High (H), Medium (M) and Low (L) findings.
- On By Vulnerability, review each finding's severity, plugin, family, CVSS, number of hosts, affected devices and whether an exploit is known.
- Click a row to open Details.
- Click Full Report to open the Cybersecurity Assessment.
How to set up email intake for a company
- Select the company, then click Toggle on Email Scan Intake to expand it.
- Click Create intake address.
- Under Allowed senders, enter a full address (scanner@example.com) or a whole domain (@example.com) and click the + button. Nothing is accepted until at least one sender is listed.
- Choose the Scan type for imported scans.
- Click Copy and paste the address into your scanner's email report settings.
- Use Accept mail at this address to pause or resume intake without deleting it.
How to delete a scan
- In the Scans list, click the red delete button on the scan.
- Confirm Delete Scan?. All hosts and vulnerability data from that scan are removed.
Tips
- A red WAN badge marks an internet-facing host or finding. Deal with these first.
- An EXPLOIT badge means a public exploit is known for that vulnerability.
- A host badge shows the matched Lavawall device; a blue badge means it was identified from a LAN network scan, and Unmatched means no device was found in inventory.
- Informational findings are left out of the By Vulnerability list.
- Who is emailed when a scan arrives by email is set per person in Notification Setup, under Vulnerability scanning.
Troubleshooting
- "Please select a company before uploading a Nessus scan file."
- Pick a single company in the company picker first. The same applies to email intake.
- "File exceeds 100 MB limit."
- Only
.nessusfiles up to 100 MB can be uploaded. Split the scan or reduce its scope. - A scanner email shows "rejected" in Recent messages.
- The sender is not on the allowed list, or intake is switched off. Add the sender and ask for the report to be sent again.
- A message shows "error" and "resend needed".
- Emailed files are not kept after processing, so the sender must send the scan again.
- Upload failed with a session message.
- Reload the page and try again; the page retries once automatically.
Task guides that use this page
Related articles
Still need help?
Search the support centre, or contact our support team and tell us which page you were on:
- Chat now: use the chat button in the bottom-right corner of this page to reach our team right away. Where cookie consent is needed, the chat starts after you accept (cookie settings).
- Email: send our support team a message through the contact page. It goes straight to a person.
- Phone:
 AB: 1-403-538-5053
 US: 1-406-988-7333
 UK: +44 20 3695 9786
Names, companies, devices and figures in the pictures are examples. Other product and company names are trademarks of their respective owners.