Cybersecurity Assessment
Turn everything Lavawall knows about a company into a single security assessment report you can review, edit and hand to the client.
What the page is for
Cybersecurity Assessment is a page in the Lavawall® console, in the Reports area. Lavawall is the RMM, security, and compliance platform from ThreeShield, built and hosted in Canada. About this feature.
The Cybersecurity Assessment page gathers security data for the selected company into one report. It opens with an Executive Summary and then groups findings into sections such as devices and infrastructure, missing patches, configuration issues, devices needing replacement, identity and account issues, domain and email security, cloud security, suspicious IP addresses, active threats, ransomware hunting and vulnerability scan results. A section only appears when there is data for it.
The Security Assessment Report section is the formal write-up. You can add your own findings (for example, physical security or training observations) with a severity, recommendation, management response and mitigating controls, set the audit period, reorder sections, and then export the report to Word or copy it.
Nessus is optional. If you import Nessus scans on the Nessus Scanner page, the report adds vulnerability scan sections, including a trend across scans and a list of vulnerabilities that were fixed. Domain and email findings appear once the company's domains have been scanned on the Domain Scan Results page.
What you see
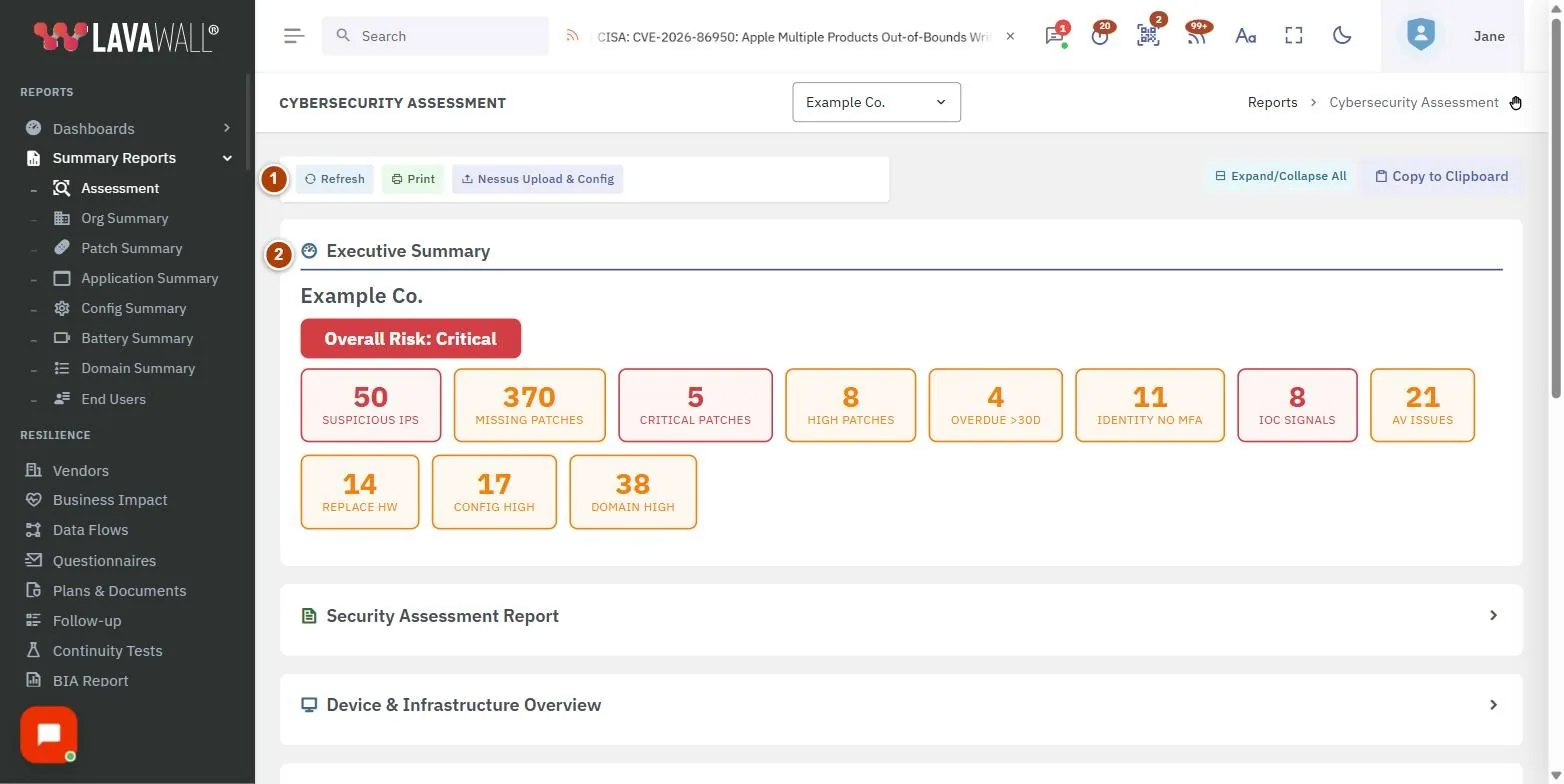
- Toolbar: Refresh, Print, Nessus Upload & Config, Expand/Collapse All and Copy to Clipboard.
- Executive Summary: a plain-language overview of what the assessment covered and the main results.
- Security Assessment Report: the formal report, with Export .docx, Copy Report, Branding and Report Config.
- Report Config: audit period, custom sections and findings, section order, scope and inclusion settings.
- Finding sections: collapsible sections for each area, from Device & Infrastructure Overview to Vulnerability Scan Findings, Vulnerability Scan Trend, Remediated Vulnerabilities and Compliance Posture.
- Add Finding: the dialog for writing your own finding.
How to use Cybersecurity Assessment
How to produce a report
- If you have not already, scan the company's domains on the Domain Scan Results page, so the domain and email findings are included.
- Select the company in the company picker.
- Wait for "Gathering security data..." to finish, then read the Executive Summary.
- Use Expand/Collapse All or click a section heading to review each area.
- Open Security Assessment Report and click Export .docx for a Word document, or Copy Report to paste it elsewhere. Print prints the whole page.
How to set the audit period
- In Security Assessment Report, click Report Config.
- Under Audit Period, type a label (for example "2026-Q1") and click the check button.
- Enter a Start and End date and click the check button. The report uses this range to show which Macs were out of date during the assessment and how many were updated by the end. Resolved issues stay in the report for the whole period.
How to add your own finding
- In Report Config, under Custom Report Sections & Findings, click Add Finding.
- Choose a Report Section, or pick New section heading and choose a preset (such as Physical Security or Backup & Recovery) or type your own, then choose its Position in Report.
- Enter the Finding Title and choose a Severity. Click Guide me to answer a few questions and get a CVSS-aligned rating, or (what each level means) for definitions.
- Write the Description, Recommendation, Management Response and Mitigating Controls.
- Click Save Finding. Use Add Heading to create an empty section first if you prefer.
How to tailor what the report includes
- Open Report Config.
- Drag sections in Section Order to reorder them, or click Reset.
- Under Assessment Scope, tick the areas the Executive Summary should say were covered. Reset returns to the areas detected from the data.
- Toggle domains under Domain Scan Inclusions and email domains under Personal Email Domains.
- Set the Administrator Threshold (how many admin accounts count as excessive) and the monthly Licence Cost per Seat in Canadian dollars to show what dormant and suspended accounts cost each year. Leave the cost blank to omit it.
- Give friendly names to addresses under IP Address Names. They appear throughout the report.
- After reviewing, you can move suspicious IP or external sharing details to an appendix, include the Discovered SaaS Register as an appendix, turn Combined Findings groups on or off, and add non-compliant controls from Compliance Assessment Findings.
Tips
- Nessus is optional. If you use it, upload a recent scan before building the report so the vulnerability sections are current. If more than one scan exists, a scan picker above the vulnerability section lets you choose which one it uses.
- Combined Findings reports a control once even when several frameworks assess it. Turn a group off to list those controls separately.
- Use Branding to set the logo and colours used on branded output.
- Copy to Clipboard copies a prompt you can paste into an AI assistant to draft a narrative assessment. That section is not printed.
Troubleshooting
- A section I expect is missing.
- Sections only appear when the company has data for them, for example Vulnerability Scan Findings needs an imported Nessus scan.
- Domain and email findings are missing.
- Scan the company's domains on the Domain Scan Results page first. The findings appear in the report after the scan.
- The report still shows an old issue.
- Issues resolved during the audit period stay in the report for that period by design.
- Dormant account costs are not shown.
- Enter a Licence Cost per Seat in Report Config.
- Too many admin accounts are flagged.
- Raise the Administrator Threshold for larger organizations.
Task guides that use this page
Related articles
Still need help?
Search the support centre, or contact our support team and tell us which page you were on:
- Chat now: use the chat button in the bottom-right corner of this page to reach our team right away. Where cookie consent is needed, the chat starts after you accept (cookie settings).
- Email: send our support team a message through the contact page. It goes straight to a person.
- Phone:
 AB: 1-403-538-5053
 US: 1-406-988-7333
 UK: +44 20 3695 9786
Names, companies, devices and figures in the pictures are examples. Other product and company names are trademarks of their respective owners.