Deploy the Phishing Reporter and clean up a reported phish
Give users a button to report phishing, then remove a reported message from every mailbox it reached and block the sender.
A Lavawall® task guide: 8 steps across 4 console pages.
Before you start
- Who can do this: Users with the "authorize Microsoft 365 only" permission (connect without seeing monitoring data); you also need a Microsoft 365 administrator account to sign in
- Plan: Connecting is included; monitoring needs M365 / Google Workspace Monitoring (included in Grow, Professional, and Complete). Phishing Reporter (add-on, or included in Complete). See pricing.
- Where to start: open Connect Microsoft 365 in your console.
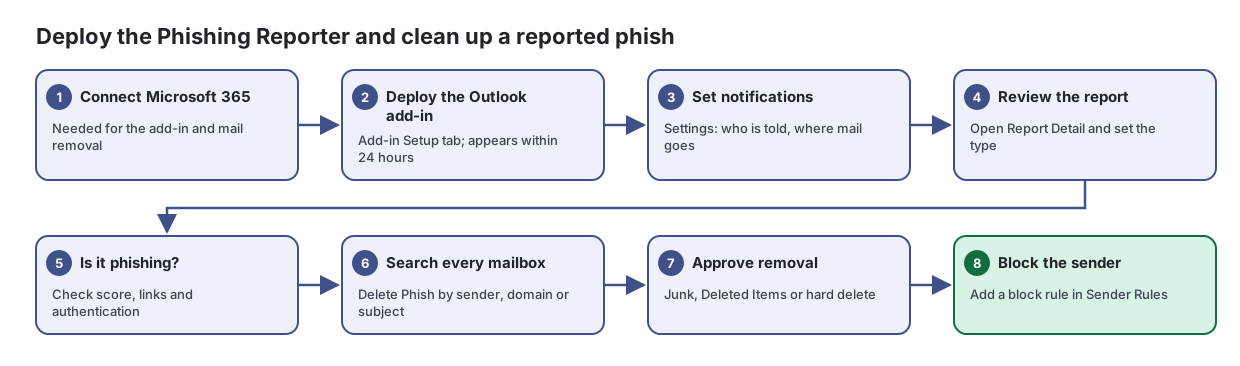
Steps
- Connect Microsoft 365. Needed for the add-in and mail removal
Connect or re-authorize your Microsoft 365 tenant so Lavawall can monitor it, without seeing any monitoring data yourself.
From the article: How to connect Microsoft 365
- Click Connect Microsoft 365.
- In the Microsoft 365 Authorization dialog, choose the access level:
- Sign in with a Microsoft 365 administrator account.
- Review the permissions Microsoft shows and accept them.
- You are returned to Lavawall and the page shows Connected with your tenant.
- Deploy the Outlook add-in. Add-in Setup tab; appears within 24 hours
Give every Outlook user a button to check and report suspicious email, and review everything they report in one place.
From the article: How to deploy the add-in
- Open Add-in Setup. If Microsoft 365 is not connected, click Connect Microsoft 365 first.
- Download the manifest, or copy the Manifest URL.
- Sign in to the Microsoft 365 admin centre as a Global Administrator and go to Settings → Integrated apps → Upload custom apps.
- Set the app type to Office Add-in, provide the manifest link or upload the file, and click Validate.
- Assign it to the Entire organization (or a pilot group), accept the permissions and click Finish deployment.
- The add-in appears in Outlook within 24 hours. If you installed it yourself earlier, click I've already installed it manually and then Mark as Deployed.
- Set notifications. Settings: who is told, where mail goes
From the article: How to set what happens to reported email and who is told
- Open Settings.
- Set the popup titles and messages users see for simulations and suspicious email.
- Choose where reported phishing is moved (Junk Email, Deleted Items or Don't move) and where verified simulations go.
- Enter Support / notification email address(es) and tick which user actions send a notification: Reported as Phishing, Not sure (submitted for review), Not Phishing: Mark as Safe.
- Optionally tick Also create a help-desk ticket for each report and Forward suspicious emails to notification address.
- Click Save Settings.
- Review the report. Open Report Detail and set the type
From the article: How to review a report
- On Reports, filter to Unreviewed or search for a sender or domain.
- Click a report to open Report Detail.
- Read the suspicion score and reasons, check where links go and preview the message safely.
- Choose a type (Confirmed Phish, Confirmed Clean, Suspicious or Simulated), add Review Notes and click Save.
- If it is phishing, click Delete Phish and choose By sender, By domain, By sender IP or By subject to find and remove the same email from other mailboxes.
- Is it phishing? Check score, links and authentication
- Search every mailbox. Delete Phish by sender, domain or subject
Find a phishing email in every Microsoft 365 mailbox it reached, then move it to Junk, move it to Deleted Items or delete it permanently, in one approved action.
From the article: How to find a phishing email in every mailbox
- Optional: drop the reported email into Start from a .eml. The sender, domain, IP and subject are filled in.
- Choose One company and pick it, or choose All companies I manage.
- Fill in one or more of Sender email, Sender domain, Sender IP and Subject. Every field you fill in must match.
- Choose how far back to search in Look back (7 days to 1 year).
- Click Search mailboxes. Results appear as the search runs.
- Approve removal. Junk, Deleted Items or hard delete
From the article: How to remove the messages
- Review the results. Tick the messages to act on, or click Select all.
- Choose Action for selected: Move to Junk (recoverable), Move to Deleted Items (recoverable) or Hard delete: permanent.
- Click Approve & queue.
- Type the confirmation word shown (JUNK, DELETE or PURGE) and confirm.
- Watch the Result column change to Junk ✓, Deleted ✓ or Purged ✓.
- Block the sender. Add a block rule in Sender Rules
Work through quarantined email, release requests, user phishing reports and blocked sign-ins for your Microsoft 365 customers in one queue.
From the article: How to manage sender allow and block rules
- Open Sender Rules to see the Allow List and Block List.
- Click Add Rule, choose Allow (whitelist) or Block (blacklist), and enter the Sender (email or domain).
- For allow rules, set Expiry (for allow rules) (no expiry, 45 days, 90 days or 1 year), add a Reason and click Add Rule.
- To remove a rule, click its remove button and confirm.
When you are done
Users can report suspicious email in one click, the phish is gone from every mailbox, and the sender is blocked.
Articles for the pages in this guide
- Connect Microsoft 365: Connect or re-authorize your Microsoft 365 tenant so Lavawall can monitor it, without seeing any monitoring data yourself.
- Delete Phish: Find a phishing email in every Microsoft 365 mailbox it reached, then move it to Junk, move it to Deleted Items or delete it permanently, in one approved…
- Phishing Reporter: Give every Outlook user a button to check and report suspicious email, and review everything they report in one place.
- Security Review: Work through quarantined email, release requests, user phishing reports and blocked sign-ins for your Microsoft 365 customers in one queue.
Still need help?
Search the support centre, or contact our support team and tell us which step you are on:
- Chat now: use the chat button in the bottom-right corner of this page to reach our team right away. Where cookie consent is needed, the chat starts after you accept (cookie settings).
- Email: send our support team a message through the contact page. It goes straight to a person.
- Phone: AB: 1-403-538-5053, BC: 1-778-731-1339, ON: 1-289-724-8829, US: 1-406-988-7333, UK: +44 20 3695 9786.