Prepare for and run an external audit
Get your controls, evidence, and requests ready, then run the audit with your external auditor through to the final report.
A Lavawall® task guide: 8 steps across 6 console pages.
Before you start
- Who can do this: Anyone with a GRC role that can view compliance data can see the preview and past reports; exporting needs a role that can export; changing the layout, adding sections and marking a report final need audit permission
- Plan: GRC Compliance Platform (included in Complete). See pricing.
- Where to start: open Audit Report in your console.
Steps
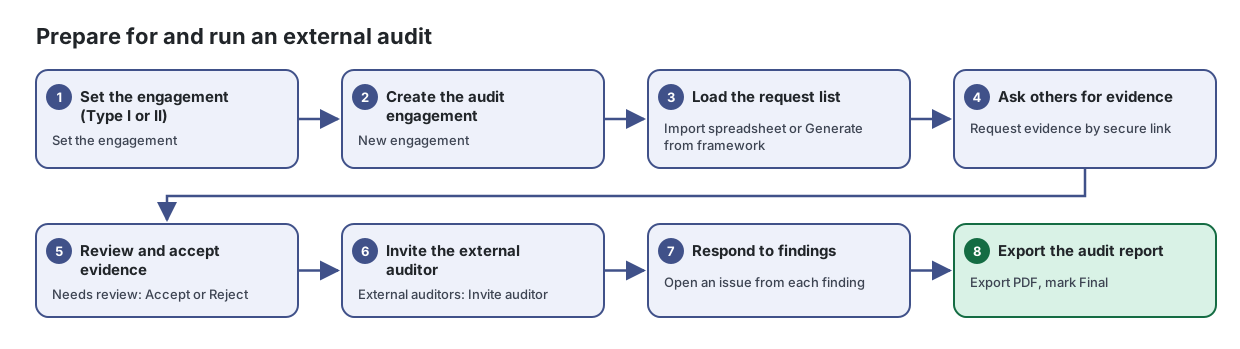
- Set the engagement (Type I or II). Set the engagement
Work through every control in your chosen frameworks: see its status, owner, design, supporting documents and evidence at a glance, and open any control to write or review its design.
From the article: How to set the engagement
- Select Set the engagement (or Change).
- In The engagement, choose the Framework and enter a Name.
- Choose the Report type (Type I or Type II) and enter the Period start and Period end (Type I uses a single "as at" date).
- Select Save. There is one engagement per framework; changing the framework starts a new one.
- After the report is issued, select Lock so the engagement's dates and type can no longer change.
- Create the audit engagement. New engagement
Run an audit from start to finish: the auditor's request list, the evidence for each request, Type II samples, findings, external auditor access and the final evidence package.
From the article: How to set up an engagement
- Select New engagement.
- Enter the Title, choose the Framework (only your active frameworks are listed) and Audit type, and set Period start, Period end, Status and Audit firm.
- Add Notes (scope, contacts, milestones). External auditors see these notes as the engagement scope.
- Select Save.
- Load the request list. Import spreadsheet or Generate from framework
From the article: How to build the request list
- Open the engagement and stay on Requests.
- Choose one of:
- Select Collect evidence automatically to link evidence Lavawall already has.
- Ask others for evidence. Request evidence by secure link
Ask a vendor, IT provider or manager to upload evidence through a secure link, then review and accept what they send.
From the article: How to request evidence
- Select Request evidence.
- Fill in What do you need? (for example "Q3 backup restore test results") and Instructions. Say exactly what counts: which system, which period, what a screenshot must show.
- Enter the Recipient email and Recipient name.
- Optionally choose a Control (optional); files you accept are linked to it. Choose an Internal owner (optional) to be told when the evidence arrives.
- Set Repeats, Due date and Link expires, and if needed Maximum files and Maximum total size.
- Select Create and email. The link is emailed to the recipient.
- Review and accept evidence. Needs review: Accept or Reject
Keep every file and record that proves your controls work in one place, reviewed, linked to controls and tracked for expiry.
From the article: How to review evidence
- Click the Needs review tile.
- Open an item and check the file (use Download).
- Select Accept, or Reject with a note (a note is required to reject).
- Reviewing evidence you collected yourself needs a reason that auditors can read, and is only possible where your company allows self-approval.
- Invite the external auditor. External auditors: Invite auditor
From the article: How to invite an external auditor
- Open External auditors and select Invite auditor.
- Enter their Email, Name and Firm.
- Choose what they can do: Can download evidence files, Can comment on requests, Can add new requests, Can raise findings and Can evaluate the control designs shared with them.
- Set Access ends (defaults to 90 days after the period ends) and select Send invitation.
- On Details, under What the external auditor may do with evidence, choose View only. or Downloads allowed. and select Save settings.
- Respond to findings. Open an issue from each finding
Keep one list of everything that needs fixing, who is responsible for it, who is doing it, when it is due and where it stands.
From the article: How to generate issues from findings
- Select Generate from findings.
- Tick the sources to use: Failing automated checks, "No" answers in the latest assessments and, where available, Resilience follow-up findings.
- Select Generate. The summary shows how many issues were created, reopened, updated and closed. Issues whose finding has gone away are closed; your own responsibility, assignee, due date and status choices are kept.
- Export the audit report. Export PDF, mark Final
Build the report for an audit engagement, preview exactly what the client will receive, and export it as a Word document or PDF.
From the article: How to build and export a report
- Choose the engagement in the Engagement picker.
- In Report configuration, set Written for, Page size and an optional Watermark (for example CONFIDENTIAL), and tick Include the evidence index if needed.
- Under Sections, switch off sections you don't need and use the arrows to change the order. Select Save.
- Check the preview on the right.
- Select Export .docx or Export PDF, then choose Draft or Final.
- Download the file from Reports generated.
When you are done
The auditor has what they asked for, each finding is tracked as an issue, and the audit report is exported.
Articles for the pages in this guide
- Audit Report: Build the report for an audit engagement, preview exactly what the client will receive, and export it as a Word document or PDF.
- Audits: Run an audit from start to finish: the auditor's request list, the evidence for each request, Type II samples, findings, external auditor access and the…
- Controls (Control Design): Work through every control in your chosen frameworks: see its status, owner, design, supporting documents and evidence at a glance, and open any control…
- Evidence Library: Keep every file and record that proves your controls work in one place, reviewed, linked to controls and tracked for expiry.
- Evidence Requests: Ask a vendor, IT provider or manager to upload evidence through a secure link, then review and accept what they send.
- Issues & Remediation: Keep one list of everything that needs fixing, who is responsible for it, who is doing it, when it is due and where it stands.
Still need help?
Search the support centre, or contact our support team and tell us which step you are on:
- Chat now: use the chat button in the bottom-right corner of this page to reach our team right away. Where cookie consent is needed, the chat starts after you accept (cookie settings).
- Email: send our support team a message through the contact page. It goes straight to a person.
- Phone: AB: 1-403-538-5053, BC: 1-778-731-1339, ON: 1-289-724-8829, US: 1-406-988-7333, UK: +44 20 3695 9786.